Evacuate the A/C system. (See Reclamation And Charging With Recovery / Charging Unit on Page 70-40-3.)
Open the right side cover.
Remove the right upperstructure cover. (See Removal And Installation on Page 40-80-1.)
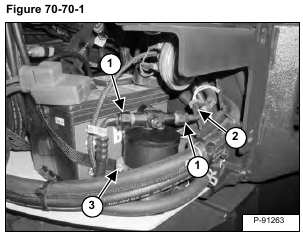
Mark the hoses (Item 1) [Figure 70-70-1] for proper installation.
Both fittings on the drier are the same size, so the hoses can be hooked up incorrectly.
Note the flow direction on the drier for proper installation.
Remove the A/C hoses (Item 1) [Figure 70-70-1] from the receiver / drier.
Cap and plug the hoses and the receiver / drier fittings with the proper A/C caps and plugs.
Installation: Tighten the hoses (Item 1) [Figure 70-70-1]to 15 – 17 N•m (11 – 13 ft-lb) torque.
Disconnect the wire harness (Item 2) [Figure 70-70-1].
Loosen the hose clamps (Item 3) [Figure 70-70-1] that hold the receiver / drier to the mount.
Remove the receiver / drier from the excavator.
NOTE: When replacing a receiver / drier in an A/C system 30 cc (1 U.S. fl oz) of PAG 100 oil must be added to the system when recharging.
