The pilot pressure valve supplies lower hydraulic pressure to joysticks.
The following tools will be needed for testing the pilot pressure relief valve:
MEL 1355 – Test Kit includes the following
MEL 1355-2 – 6894,8 kPa (68,9 bar) (1000 psi) Gauge
MEL 1355-9 – Thermometer
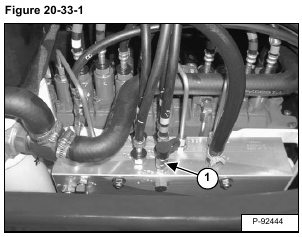
The diagnostic port (Item 1) [Figure 20-33-1] will be used to check the pressure reducing valve.
With the engine off, and the key in the run position, lower the left console and move both joysticks to relieve hydraulic pressure.
Open the right side cover.
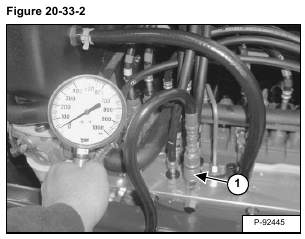
Install a 6894,8 kPa (68,9 bar) (1000 psi) gauge on the diagnostic port (Item 1) [Figure 20-33-2].
Lower the control console and fasten the seat belt.
Start the engine and warm the hydraulic fluid to a minimum operating temperature of 66°C (150°F).
With the hydraulic fluid at operating temperature, run the engine at full rpm.
Engage the bucket curl circuit and fully curl the bucket.
The pilot pressure relief valve pressure should be as follows:
A target pressure of 2951 kPa (30 bar) (428 psi) with an acceptable range of 2799 – 3103 kPa (28 – 31 bar) (406 – 450 psi).
Move the engine speed control to low idle speed.
Stop the engine.
With the engine off, and the key in the run position, lower the left console and move both joysticks to relieve hydraulic pressure.
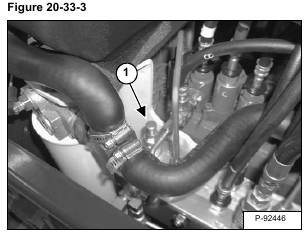
Remove the cap (Item 1) [Figure 20-33-3].
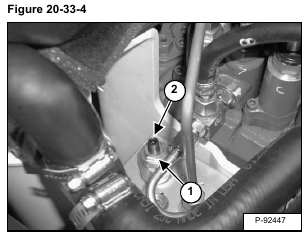
Loosen the nut (Item 1) [Figure 20-33-4].
Turn the adjustment screw (Item 2) [Figure 20-33-4] clockwise to increase the pressure or counterclockwise to decrease the pressure.
NOTE: 1/4 turn is approximately 275,8 kPa (2,8 bar) (40 psi).
Tighten the nut (Item 1) [Figure 20-33-4].
Retest the pilot pressure relief valve after adjustment.
If the pressure is still incorrect, relieve hydraulic pressure and remove the valve from the manifold assembly for inspection or repair.
If the amount of oil pressure is at or over the service limits, it is an indication of worn O-rings and back-up rings on the valve or a stuck valve.
Inspect the valve (Item 1) [Figure 20-33-5] on the manifold assembly to verify no damage. If damaged replace the manifold assembly.
Inspect the O-rings (Item 2) [Figure 20-33-5] on the valve. If O-rings are worn or damaged, replace O-rings.
(See Disassembly And Assembly on Page 20-60-4.)
Re-install the valve in the manifold assembly.
Repeat the pilot pressure relief valve test.
If the O-rings are not worn or damaged and the correct pressure could not be achieved, replace the valve.


