The tools listed will be needed to do the following procedure:
MEL1563 or 6689779 – Remote Start Tool
MEL10103 – Hydraulic Tester
MEL10106 – Hydraulic Test Kit
6661247 – Filter Assembly
17 KB 1212 – Elbow Fitting
15 KB 1212 – Straight Fitting
15 KB 0812 – Reducer Fitting
Lift and block the loader. (See Procedure on Page 10-10-1.)
Raise the lift arms and install an approved lift arm support device. (See Installing on Page 10-20-1.)
NOTE: The fluid from the charge pump must be filtered after it passes through the Hydraulic Tester, to prevent any contamination to the Hydrostatic Pumps.
Raise the operator cab. (See Raising on Page 10-30-2.)
Open the rear door of the loader.
Connect the remote start tool. (See REMOTE START TOOL KIT-MEL1563 on Page 10-60-1.)
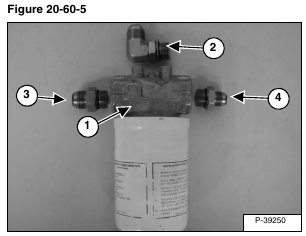
Assemble the filter assembly (Item 1), elbow fitting (Item 2), straight fitting (Item 3) and the reducer fitting (Item 4) [Figure 20-60-5].
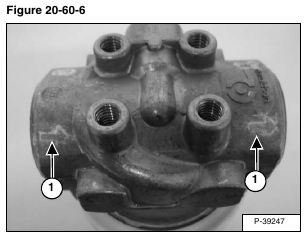
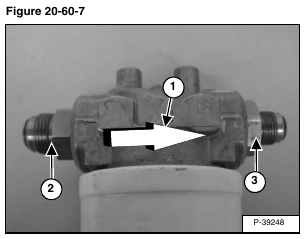
Determine the proper direction of oil flow through the filter housing (Item 1) [Figure 20-60-6] and [Figure 20-60-7].
Install the fitting (15KB 1212-Straight Fitting) (Item 2) [Figure 20-60-7] in the filter housing inlet.
Install the fitting (15KB 0812-Reducer Fitting) (Item 3) [Figure 20-60-7] in the filter housing outlet.
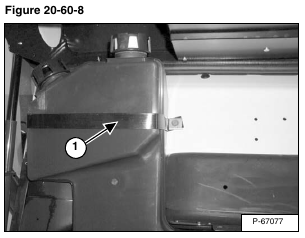
Remove the hydraulic reservoir strap (Item 1) [Figure 20-60-8] and lower the hydraulic reservoir.
Secure the hydraulic reservoir in a place that allow room to reach the hydraulic fan motor.
NOTE: The hydraulic reservoir is full of hydraulic fluid so only tip the hydraulic reservoir enough to reach the charge hose that goes into the hydraulic fan motor.
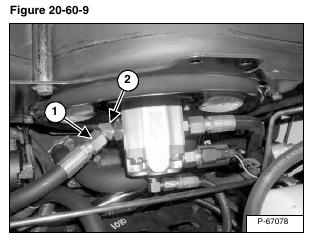
Disconnect the OUTLET hose (Item 1) [Figure 20-60-9] from the hydraulic fan motor.
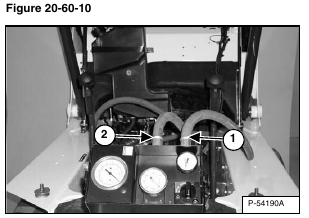
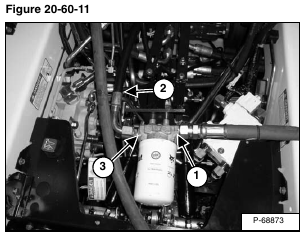
Connect the INLET hose (Item 1) [Figure 20-60-10] from the tester to the OUTLET hose (Item 1) [Figure 20-60-9] of the pump. Connect the OUTLET hose (Item 2) [Figure 20-60-10] from the tester to inlet side of the hydraulic filter assembly (Item 1) [Figure 20-60-11].
Connect a 3000 PSI hydraulic hose (Item 2) [Figure 20-60-11] approximately 3 feet long to the outlet side of the hydraulic filter assembly (Item 3) [Figure 20-60-11] and the fitting on the hydraulic fan motor (Item 2) [Figure 20-60-9].
Mount the hydraulic reservoir back into its original spot and install the mounting strap.
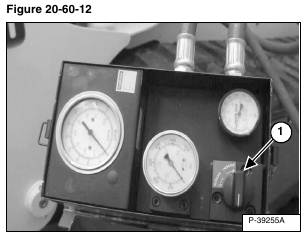
Be sure all connections are tight and that the hoses are not touching any moving parts before starting the loader [Figure 20-60-12].
Start the engine and run at low idle RPM. Make sure the tester is connected correctly. If no flow is indicated on the tester, the hoses are connected wrong. With the hoses connected correctly, increase the engine speed to full RPM*.
Warm the fluid to 140° F (60° C) by turning the restrictor control (Item 1) [Figure 20-60-12] on the tester to about 1000 PSI (6895 bar). DO NOT exceed system relief pressure. Open the restrictor control and record the free flow (GPM) at full RPM*.
Turn the restrictor down to system operating pressure.
DO NOT EXCEED SYSTEM RELIEF PRESSURE. Refer to Hydraulic Schematics for pressure. The high pressure flow must be at least 80% of free flow.
A low percentage may indicate a failed pump.
*Refer to (See Hydraulic System on Page SPEC-10-3.) for system relief pressure and full RPM.
*Refer to the Hydraulic Schematics for pump flow and RPM.
