Clean all parts in solvent and dry with compressed air.
Inspect all parts for wear or damage. Replace any worn or damaged parts.
Always install new seals and O-rings. Lubricate all seals and O-rings with clean hydraulic fluid before installation.
Install the O-ring on the piston [Figure 20-26-19].
NOTE: Do not overstretch the seal.
Install the seal on the tool and stretch it until it fits the piston [Figure 20-26-20].
Allow the seal to stretch for 30 seconds before removing it from the tool.
Install the seal on the piston [Figure 20-26-21].
Use a ring compressor to compress the seal to the correct size [Figure 20-26-22].
Leave the piston in the ring compressor for three minutes.
Install the oil seal on the rod seal tool [Figure 20-26-23].
NOTE: The O-ring side of the oil seal goes toward the inside of the cylinder.
Install the oil seal in the head [Figure 20-26-24].
Install the wiper seal with the lip toward the outside of the head [Figure 20-26-25].
Install the O-ring (Item 1) [Figure 20-26-26] on the head.
Install the back-up ring (Item 1) [Figure 20-26-27] on the head.
Install the O-ring (Item 1) [Figure 20-26-28] on the head.
Apply grease to the inside of the head and to the lips of the seals.
Inspect the beveled edge of the rod for nicks or sharp edges (Item 1) [Figure 20-26-29]. Remove these with a file prior to installing the head on the rod or damage to the seals may occur.
Install the head (Item 2) [Figure 20-26-29] on the rod.
Install the piston (Item 3) [Figure 20-26-29] on the rod.
Clean and dry the cylinder rod threads. Grease the shoulder of the cylinder rod.
Install the nut (Item 1) [Figure 20-26-30].
If the thread size of the nut is 22,2 mm (0.875 in), tighten the nut to 407 N•m (300 ft-lb) torque.
If the thread size of the nut is 28,6 mm (1.125 in), tighten the nut to 1152 N•m (850 ft-lb) torque.
Inspect the inside of the cylinder housing for nicks and scratches. If the cylinder housing has minor scuffing the cylinder housing can be honed. Use a flexible hone and lubricate with oil during the honing process.
The following hones can be ordered from OTC Service
Tools:
MEL1418 – 50,8 mm (2 in)
OEM6275 – 69,9 – 76,2 mm (2-3/4 – 3 in)
OEM6270 – 76,2 – 88,9 mm (3 – 3-1/2 in)
OEM6271 – 88,9 – 101,6 mm (3-1/2 – 4 in)
Thoroughly wash the inside of the housing after the honing process.
Apply oil to the seal surface of the housing [Figure 20-26-31].
Apply oil to the Teflon seal on the piston [Figure 20-26-32].
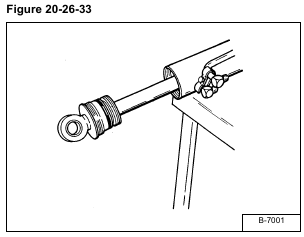
Install the rod assembly in the housing [Figure 20-26-33].
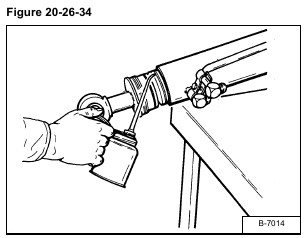
Apply oil to the seals on the head [Figure 20-26-34].
Apply oil to the threads of the head.
Use the adjustable gland nut wrench to tighten the head [Figure 20-26-35].
NOTE: Tighten gland until it is flush with the end of the housing.
Move rod in and out of cylinder housing and make sure that it moves freely.


